


DIY Needle Minders
- Jacquie
- Sep 1, 2025
- 3 min read
Some of the links included on this page are affiliate links. This means that, at zero cost to you, I may earn an affiliate commission if you click through the link and finalize a purchase.

Whether you cross stitch, needlepoint, or hand embroider, needle minders are a must have stitching accessory! These small but mighty magnetic tools attach directly to your fabric damage free and securely hold your needle in place. The best part? No more misplaced needles!
You can find so many cute needle minders online but they are also incredibly easy to make at home with very little effort required. Included below is a super easy step-by-step tutorial on how to DIY your very own needle minder at home.
Links to Project Supplies
Small, lightweight object such as an enamel pin, button, or even a lego!
Flush cutter pliers and file (optional, for removing pin backing)

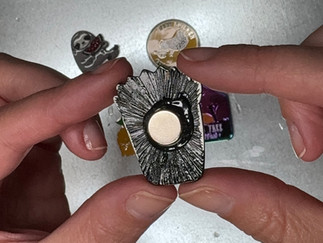
Step 1: Pick Your Object
Enamel pins are the most popular choice for needle minders, but any small, lightweight object will do! Buttons, charms, even mini figurines are all cute options - just make sure it's not too heavy and won't weigh down your fabric too much.
Step 2: Prep the Back
If you're using a pin, remove the post with pliers so the back is flat. A file comes in handy for removing any remaining sharp edges from the back. You'll want to get the back as smooth and flat as possible (you don't want to risk damaging your fabric later on!).


Step 3: Add the Magnet
Make sure you look for neodymium magnets as I've found they work the best. Place a small dot of E6000 glue to the back of your object and place the magnet into the glue, making sure it's centered. I prefer using a size 10x3mm neodymium magnet for this step, but your personal preference may be different!


Safety Notes
E6000 is an industrial-strength adhesive, so be sure to use it safely. Always work in a well-ventilated area since the fumes can be strong, and avoid direct skin contact by wearing gloves if possible.
Neodymium magnets are very strong and can be dangerous if swallowed or pinched. Keep them away from children, pets, and electronics, and handle with care while crafting.
Step 4: Let It Cure
Now for the hard part, waiting! It really is best to let the glue cure for a full 24 hours before putting your needle minder to use.
Step 5: Put It to Work
Now that the hard part is done your needle minder is ready to use! Place your minder on the front of your fabric or canvas and secure with a second magnet on the back side of your work. I prefer using a 12x2mm magnet for securing the minder on the back. Now you can set your needle on top and it will stay in place like ✨magic✨ (well not magic, just magnetism, but it's fun!).


Fair warning, once you make one needle minder you'll want to start turning every cute little object you find into your own personalized stitching tool! The good news is you can never have too many and they make great gifts for fellow stitchers. Let me know in the comments what fun objects have you used for needle minders in the past!
With love and creativity,
Jacquie
Atom Heart Cross Stitch