


Making a Plastic Canvas Strawberry Dollhouse
- Jacquie

- Sep 16, 2025
- 5 min read
Updated: Sep 29, 2025
Some of the links included on this page are affiliate links. This means that, at zero cost to you, I may earn an affiliate commission if you click through the link and finalize a purchase.

I've been eyeing this pattern for a while, and with the holidays right around the corner I figured it would be the perfect gift for my best friend's daughter! She loves arts and crafts and has been asking me to make her something — so, Strawberry Dollhouse it is!
Tools & Materials
This adorable Strawberry Dollhouse pattern is available from Annie's Attic. I'm making some modifications to make use of materials I already have at home and changing a few things that I think will look better overall. Included below is a table listing the called-for materials and and substitutions I'm making.
Called-For Material | Substitution | Notes |
I had to make some modifications like extra overcast stitching to account for the clear plastic. I used scrap material I already had on hand so can't say for certain how many total sheets I used | ||
Annie's Choice plastic canvas yarn in Holiday Red Annie's Choice plastic canvas yarn in Holiday Green Annie's Choice plastic canvas yarn in Banana | I don't think the called-for yarns exist anymore, but any worsted weight yarn will work. I pulled from my yarn stash at home for the colors I used, just keep in mind if you are purchasing a full skein of worsted weight yarn you will not come close to using it all and will have a lot left-over! | |
Strawberry print fabric | Green felt is used for the bed blanket. I will be substituting with a strawberry print fabric I already have on hand | |
I opted for a magnetic purse clasp in place of velcro as I thought this would hold up much better over time | ||
Gold tube beads were used in place of yellow fabric paint for the seed detailing. I added red beads to the windows and a heart-shaped rhinestone as a door knob. | ||
I used a size 28 tapestry needle and diamant thread to sew in the beads but you can use anything you have on hand! | ||
Just a quick little product plug - I recently purchased this mini cordless hot glue gun and I wish I had bought one sooner it is so much better to use then a corded one! For under $20 it's a steal! |
A few additional tools I find extremely helpful when working with plastic canvas:
For more plastic canvas product recommendations, you can check out my Amazon storefront and my All About Plastic Canvas blog post.
Tips and Tricks
For this pattern I'm starting with the dollhouse construction — cutting all of the required pieces first, before stitching. This ensures I don’t risk snipping into finished stitches and having to redo any work later.

I like to use a whiteboard marker or a china-marking pencil to outline shapes on the canvas. Once the pieces are cut, I either leave the markings (they’ll usually be covered by stitches) or wipe them away with rubbing alcohol. Non-acetone nail polish remover can also work; just keep in mind that acetone can cause the plastic to degrade, so steer clear of that!
Whether this is your first plastic canvas project or your tenth, my best suggestion is to get a plastic canvas hole counter — it saves so much time measuring and counting out each shape. Even with a smaller project like this one, you'd be surprised how much time it saves.
Pattern Modifications
I'll be updating this post frequently as I work my way through the pattern, keeping a running list of the modifications I'm making.
Dollhouse Base
The pattern calls for the base to be 22 holes × 19 holes. I believe this is an error, as it doesn't line up with the strawberry shape for the front and back pieces. To rectify this, I made the base 23 holes × 19 holes.
Door & Windows
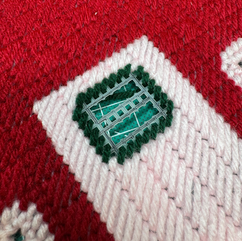
The pattern calls for separate shapes to be cut out for the door, door window, and windows. I found this step to be unnecessary and proceeded to stitch the windows and door directly onto the front panel. I also cut through the front panel where the window openings are placed and then overcast stitched around those edges.


Handle
The pattern calls for 2 handle pieces to be cut from green plastic canvas and for the bottom piece to remain unstitched. Because I am using clear plastic canvas I stitched both the top and bottom handle pieces. I then joined them together (wrong sides facing) with a whipstitch and attached to the top following the pattern instructions.
Exterior Beading
The pattern calls for adding seeds to the back panel of the exterior using yellow fabric paint. I opted to add seeds instead using 2x5mm gold tube beads (purchased as part of a larger set) and added them to both the back, front, and side panels.
I added additional beading around the door window and window trim. I used red seed beads I had on hand for the windows and tied in the gold beads used for the seeds to frame the door window. I made use of some rhinestones I had and added a red, heart-shaped rhinestone using hot glue to the front door to serve as a door knob.
The pattern also calls for painting seeds on the furniture pieces. My current plan is to use 2mm gold seed beads for the furniture...but I haven't gotten that far yet! I will post those details once I have completed the furniture.


Interior Felt Lining
The pattern calls for adhesive felt lining placed on the wrong sides of the back and front panels. I opted to also add lining to the side panels as well. I also cut squares into the felt on the front panel piece to account for my door and window openings.


Dollhouse Closure
The pattern calls for 1-inch squares of hook and loop tape to be placed on the front panel and leaf flap to secure the dollhouse closed. I opted instead to use a sew-in magnetic purse clasp as I felt this would hold up better over time. The clasp I purchased was very strong so I only added one. And yes, my sewing skills for attaching the clasp is not pretty...but it is functional!


Blanket
The pattern calls for a small piece of green felt to be used for the bedding. I have the cutest strawberry print fabric at home that I plan to use instead. This fabric was purchased from Joanne (RIP) so, unfortunately, I cannot link to the exact one I'm using.
Doll
Is it really a dollhouse if theres no doll? The pattern does not include any type of doll pattern or reference to one that could be purchased separately. I will be stitching my own little strawberry doll and will upload a copy of the pattern I create once I get to that point. Another cute option would be a finding vintage strawberry shortcake doll!
This is a work-in-progress post and I’ll continue to provide updates with photos, stitch details, and any further pattern tweaks as I finish the build. Be sure to leave a comment with any questions you have about this project!
With love and creativity,
Jacquie
Atom Heart Cross Stitch


Comments